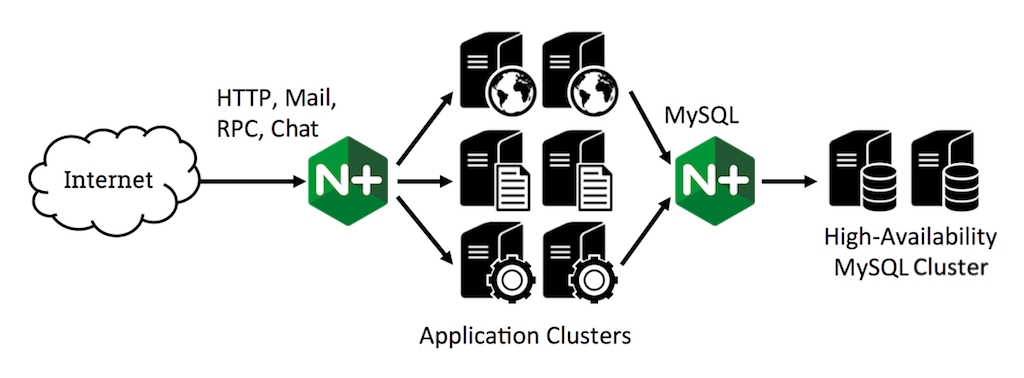
NGINX Plus Release 5 (R5) introduces a major new feature: TCP load balancing. NGINX Plus can now load balance and provide high availability for a wide range of TCP‑based protocols in addition to HTTP.

This article provides a technical overview of the TCP load balancing capabilities in NGINX Plus. For related information, check out the NGINX Plus Admin Guide and the use case in MySQL High Availability with NGINX Plus and Galera Cluster.
Editor –
- For an overview of all the new features in NGINX Plus R5, see Announcing NGINX Plus Release 5.
- NGINX Plus Release 9 and later support the features discussed in this post for UDP traffic as well as TCP.
Introduction
The new Stream module implements TCP load balancing. This module, like the HTTP and Mail modules, enables you to configure one or more listen servers, in this case for TCP connections. Connections are forwarded to the upstream server group named by the proxy_pass directive. A load‑balancing algorithm is used to select one of the upstream servers (in this example, db1, db2, or db3):
stream {
    server {
        listen 3306;
        proxy_pass db;
    }

    upstream db {
        server db1:3306;
        server db2:3306;
        server db3:3306;
    }
}
How NGINX Plus Load Balances TCP Traffic
New connections – When NGINX Plus receives a new client connection on the listen socket, it immediately makes a load‑balancing decision and creates a new connection to the selected upstream server.
Data transfer – NGINX Plus then monitors the client and upstream connections. As soon as data is received on one connection, NGINX Plus reads it and forwards it over the other connection. NGINX Plus maintains an in‑memory buffer for the client and upstream data (see proxy_buffer_size) and reads data to fill that buffer. If clients or servers stream large volumes of data, you may see a small performance benefit by increasing the size of the appropriate buffer, at the cost of additional memory consumption in NGINX Plus.
Closing connections – When NGINX Plus receives a close notification on either connection, or the TCP stream is idle for longer than the proxy_timeout setting, NGINX closes both connections. For long‑lived TCP connections, you might choose to increase the value of the proxy_timeout parameter and tune the so_keepalive parameter for the listen socket so that the connection is not closed prematurely and disconnected peers are detected quickly.
Load‑Balancing Methods
A range of load‑balancing methods are available for TCP load balancing: Round Robin (the default), Least Connections, and Hash (optionally with the ketama consistent hash method). These are used in conjunction with health‑monitoring data to select the target upstream server for each connection.
NGINX Plus makes the load‑balancing decision immediately, and does not inspect the data in the TCP connection. With the hash method, you can use the client IP address (as captured by the $remote_addr variable) as a key to obtain a simple mode of session persistence if necessary.
Just like other upstream modules, the Stream module for TCP load balancing supports user‑defined weights to influence the load‑balancing decision, and the backup and down parameters are used to take upstream servers out of active service. The max_conns parameter limits the number of TCP connections to an upstream server, which is very useful if the server has a concurrency limit and you want to use a different server or fail fast if all servers are at capacity.
Health Checks
The TCP load balancing module supports inline (synchronous) health checks.
A server is regarded as having failed if it refuses a TCP connection or fails to respond to the connect operation within the proxy_connect_timeout period. In this case, NGINX Plus immediately tries another server in the upstream group.
All connection failures are logged to the NGINX error log:
2014/11/27 07:40:56 [error] 22300#0: *73 upstream timed out (110: Connection timed out) while connecting to upstream, client: 192.168.56.10, server: 0.0.0.0:3306If a server fails repeatedly (as defined by the max_fails and fail_timeout parameters), NGINX marks it as failed and stops sending it new connections.
Sixty seconds after a server has failed, NGINX begins to probe it by occasionally selecting it during the load‑balancing decision to determine if it has recovered. Once the server begins to respond to new connections, NGINX slowly reintroduces it back into the upstream cluster, ramping up the connection rate during the slow_start period. This prevents the server from being overwhelmed by a burst of traffic, and minimizes the impact if the server fails again during the ramp‑up time.
Configuration Best Practices
You configure TCP load balancing in a separate stream context in the NGINX Plus configuration. There is no default structure for stream services in the NGINX Plus configuration.
It is possible to define TCP load balancing configuration in the primary nginx.conf file, but doing so brings up risks and permissions issues. It is a best practice to create a separate directory for the configuration files that define a service. Then use the include directive in the main configuration file to read in the contents of the files in the directory.
The standard NGINX Plus configuration of HTTP services puts the configuration files in a separate conf.d directory:
http {
    include /etc/nginx/conf.d/*.conf;
}
We recommend a similar approach for TCP services, defining their configuration in a separate stream.d directory. After securing the directory with the appropriate permissions, add the following to the main nginx.conf file:
stream {
    include /etc/nginx/stream.d/*.conf;
}
Related Reading
For more information on TCP load balancing and the Stream module, check out the following resources:
- NGINX Plus Admin Guide
- NGINX Stream module and
upstreamconfiguration context - Use case – MySQL High Availability with NGINX Plus and Galera Cluster
Editor –
- For an overview of all the new features in NGINX Plus R5, see Announcing NGINX Plus Release 5.
- NGINX Plus Release 9 and later support the features discussed in this post for UDP traffic as well as TCP.
Try out TCP load balancing for yourself – start your free 30-day trial today or contact us to discuss your use cases.


