There’s nothing more frustrating than being in the middle of watching a live speech when it gets stuck. Even if it’s for only a few seconds, the experience has been severely degraded. Users have no tolerance for video that skips, glitches, or doesn’t play back flawlessly every time.
NGINX Plus and BITMOVIN work together to deliver a powerful solution for scaling and delivering live video streaming and on‑demand media to your users on any device, anywhere. BITMOVIN provides an intuitive video player that when combined with the famous performance and reliability of the NGINX Plus can stream high‑quality video to hundreds of thousands of concurrent users.
(Both NGINX and NGINX Plus support the features we’re discussing, but for ease of reading we refer to NGINX Plus throughout.)

In the solution depicted in the graphic, a live RTMP video stream is pushed to NGINX Plus, which converts it to both Apple HTTP Live Streaming (HLS) and MPEG‑DASH streams, and publishes them. The Bitmovin Adaptive Streaming Player is then used to play the live video stream on the user’s choice of device.
This blog post explains step‑by‑step how to set up NGINX Plus and BITMOVIN for live video streaming.
Step 1 – Configure NGINX Plus for Live HLS and MPEG‑DASH Streaming
The first step is to configure NGINX Plus as a streaming media server. The following configuration snippet uses the ffmpeg utility to transcode the live video stream into low, medium, and high bitrate variants. For HLS, the variant streams are then published along with the original stream. For MPEG‑DASH, only the original stream is published.
rtmp {
    server {
        listen 1935;

        application app {
            live on;

            exec ffmpeg -i rtmp://localhost/src/$name
                  -c:a libfdk_aac -b:a 32k  -c:v libx264 -b:v 128K
                  -f flv rtmp://localhost/hls/$name_low
                  -c:a libfdk_aac -b:a 64k  -c:v libx264 -b:v 256k
                  -f flv rtmp://localhost/hls/$name_mid
                  -c:a libfdk_aac -b:a 128k -c:v libx264 -b:v 512K
                  -f flv rtmp://localhost/hls/$name_hi
                  -c:a libfdk_aac -b:a 128k -c:v libx264 -b:v 512K
                  -f flv rtmp://localhost/dash/$name_dash;
        }

        application hls {
             live on;

             hls on;
             hls_path /tmp/hls;
             hls_nested on;

             hls_variant _low BANDWIDTH=160000;
             hls_variant _mid BANDWIDTH=320000;
             hls_variant _hi  BANDWIDTH=640000;
        }

        application dash {
            live on;

            dash on;
            dash_path /tmp/dash;
            dash_nested on;
        }
    }
}

http {
    server {
        listen 80;

        location /hls {
            # Serve HLS fragments
            types {
                application/vnd.apple.mpegurl m3u8;
                video/mp2t ts;
            }
            root /tmp;
            add_header Cache-Control no-cache;
            add_header 'Access-Control-Allow-Origin' '*';
        }

        location /dash {
            root /tmp;
            add_header Cache-Control no-cache;
            add_header 'Access-Control-Allow-Origin' '*';
        }
    }
}
Step 2 – Enable CORS and Create crossdomain.xml
Next you enable Cross‑Origin Resource Sharing (CORS) on your NGINX Plus streaming media server, which enables streaming through HTML5, and add a cross‑domain policy file (crossdomain.xml) to enable Flash‑based streaming. On some older browsers and devices you still need Flash to play back MPEG-DASH or HLS. For a discussion, see our blog post about CORS and crossdomain.xml.
Here are the contents of a simple crossdomain.xml file:
<?xml version="1.0"?>
<cross-domain-policy>
<allow-access-from domain="*" to-ports="80,443" secure="false"/>
<site-control permitted-cross-domain-policies="master-only" />
</cross-domain-policy>
Step 3 – Select a Method for Pushing RTMP to NGINX Plus
NGINX Plus converts RTMP streams that are pushed to it. There a few different options for pushing the RTMP stream to NGINX Plus. You can use clients such as FFmpeg and Open Broadcaster, or encoders such as Elemental, Envivio (now apparently incorporated into Ericsson’s MediaFirst Content Processing product), Cisco, and others that support RTMP push.
FFMPEG
This sample ffmpeg command pushes an RTMP video stream to NGINX Plus:
# ffmpeg -re -i input_file -c copy -f flv rtmp://nginx_server_url:1935/appOpen Broadcaster
To configure Open Broadcaster to push the RTMP stream to NGINX Plus:
-
Navigate to Broadcast Settings.
-
Select Live Stream in the Mode drop‑down menu and Custom in the Streaming Service menu.
-
Enter the RTMP push URL of your NGINX Plus server in the FMS URL field. The Play Path/Stream Key field names the playlist or manifest file created by NGINX Plus (.m3u8 file for HLS and .mpd file for MPEG‑DASH).
-
Navigate to Encoding. Select the x264 radio button for Encoder, and AAC in the Codec drop‑down menu.
-
Navigate to Video. Set the same value in the FPS field as in the bitcodin encoding profile, because otherwise there might be problems with synchronization of audio and video. If no frame rate is set in the encoding profile, BITMOVIN chooses the frame rate automatically based on the input stream.
Step 4 – Set Up the BITMOVIN Adaptive Streaming Player
To set up the BITMOVIN Adaptive Streaming Player, perform the steps in this section.
-
Sign up for free.
Register at the BITMOVIN portal. At the time of writing, the free plan includes 5000 free impressions per month for the BITMOVIN player with all of these features:
- HLS and MPEG‑DASH streaming
- Video ad support
- DRM support
- VR and 360° support
- Live streaming support
- Subtitles and multiaudio support
- Fully customizable skinning
After registering, check for the activation email and log in.
-
Download the player
Download the BITMOVIN Adaptive Streaming Player. All needed information, as well as the player itself, can be found in the player overview tab of the BITMOVIN portal.
-
Specify domains.
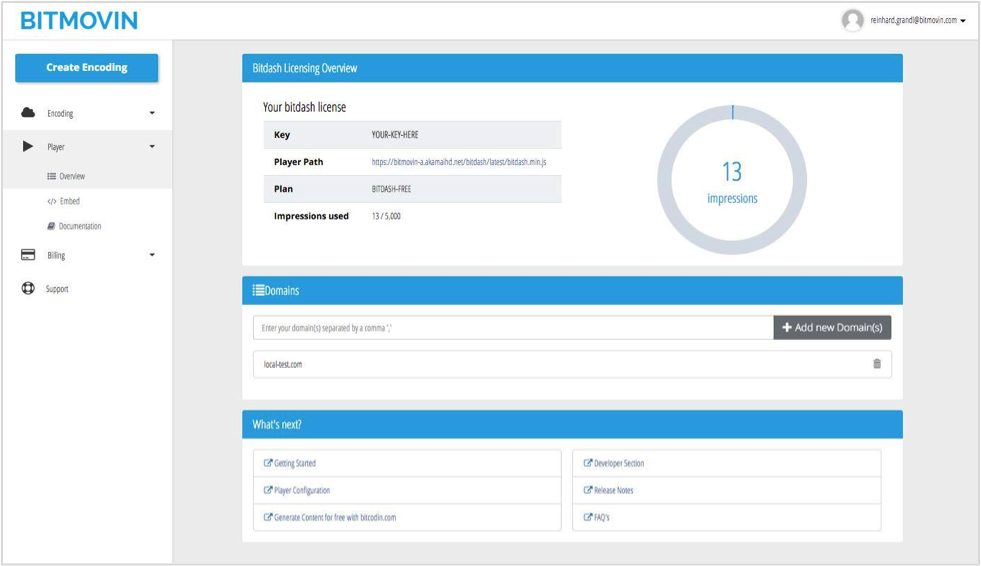
The overview page provides all relevant information and documentation (beneath your personal player key). To specify the domains you want to use with the player, click the Add New Domain(s) button as shown in the screenshot.
-
Prepare a sample page.
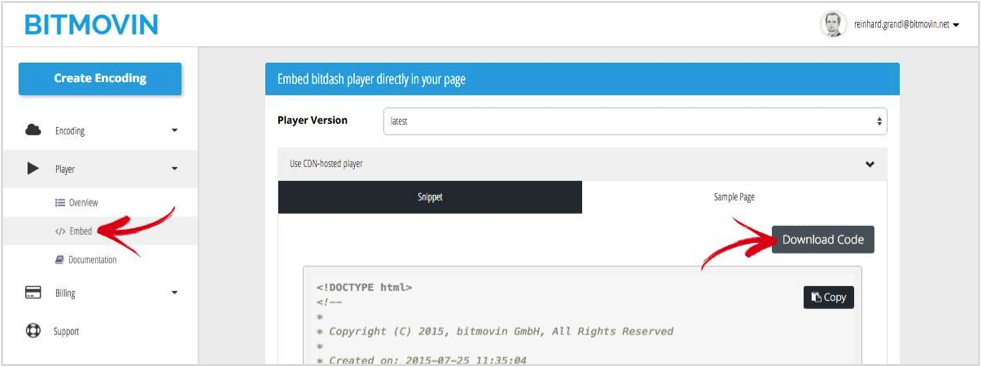
Download a preconfigured sample page, which demonstrates the player setup. Click the Download Code button on the Embed tab as shown in the screenshot.
To configure the player with your NGINX Plus server, change the player config object (lines 102–104 in the sample page). Replace the values in the
dash,hls,progressive, andposterfields as appropriate for the NGINX Plus server’s .mpd and .m3u8 files. You can remove fields that are not needed. -
Publish.
Upload the sample page to your NGINX Plus server. When you open the page, you see your video playing with low startup delay, no buffering, and in the best possible quality.
Summary
We’ve detailed the steps for setting up NGINX Plus and BITMOVIN to deliver video flawlessly to all your users. To try the solution for yourself, sign up for a free 30‑day trial of NGINX Plus and for the free BITMOVIN Adaptive Streaming Player.


