We here at NGINX, Inc. are part of the launch of OpenShift Primed, a technology program announced today with the launch of the OpenShift Container Platform. The first result of this collaboration will be making the enterprise-ready features of NGINX Plus available with the Kubernetes Ingress controller and OpenShift Origin.
We are also continuing to develop the NGINX Microservices Reference Architecture (MRA) for general release later this year. In advance of general release, we are using the MRA with NGINX Professional Services clients, deploying each of the three models – the Proxy Model, the Router Mesh Model, and the Fabric Model – on a variety of platforms.
One of our most interesting recent deployments has been to Red Hat’s OpenShift platform, an open source app‑development platform which uses Docker containers and Kubernetes for container management. We focused on deploying the Proxy Model on Red Hat OpenShift, with the goal of utilizing the new Ingress controller capability as it becomes available in OpenShift. The ability to utilize NGINX Plus as an Ingress controller for OpenShift is exciting, and provides a lot of powerful capabilities for managing the traffic into your OpenShift application.
As the name implies, the Proxy Model places NGINX Plus as a reverse proxy server in front of servers running the services that make up a microservices‑based application. In the Proxy Model, NGINX Plus provides the central point of access to the services.
The NGINX Plus reverse proxy server provides dynamic service discovery and can act as an API gateway. As follow‑on activities, we expect to implement the Router Mesh Model and the Fabric Model on OpenShift as well.
Using the Proxy Model with OpenShift
The features of the Proxy Model enable improved app performance, reliability, security, and scalability. Details are provided in our blog post about the Proxy Model. It’s suitable for several uses cases, including:
- Proxying a relatively simple application
- Improving the performance of an existing OpenShift application before converting it to a container‑based microservices application
- As a starting point before moving to the Router Mesh Model or the Fabric Model; all three models use the reverse proxy server pattern, so the Proxy Model is a good starting point
Figure 1 shows how, in the Proxy Model, NGINX Plus runs on the reverse proxy server and interacts with several services, including multiple instances of the Pages service – the web microservice that we described in the post about web frontends.

Service Discovery for the Proxy Model with OpenShift
If you are starting with an existing OpenShift application, simply position NGINX Plus as a reverse proxy in front of your application server and implement the Proxy Model features described below. You are then in a good position to convert your application to a container‑based microservices application.
The Proxy Model is agnostic as to the mechanism you implement for communication between microservices instances. (Major approaches are described here.) From among the approaches available, most tend to use DNS round‑robin requests from one service to another.
Because each service scales dynamically, and because service instances live ephemerally in the application, NGINX Plus needs to track and route traffic to service instances as they come up, then remove them from the load balancing pool as they go out of service.
NGINX Plus has a number of features that are specifically designed to support service discovery, and the MRA takes advantage of these features. The most important service discovery feature in NGINX Plus, for the purposes of the MRA, is the DNS resolver feature that queries the container manager – in this case, Kubernetes – to get service instance information and provide a route back to the service.
NGINX Plus R9 introduced SRV record support, so a service instance can live on any IP address/port number combination and NGINX Plus can route back to it dynamically. Because the NGINX Plus DNS resolver is asynchronous, it can scan the service registry and add new service endpoints, or take them out of the pool, without blocking the request processing that is NGINX’s main job. For details, read our blog post on using NGINX for DNS‑based service discovery.
The DNS resolver is also configurable, so it does not need to rely on the time‑to‑live (TTL) in DNS records to know when to refresh the IP address – in fact, relying on TTL in a microservices application can be disastrous. Instead, the valid parameter to the resolver directive allows you to set the frequency at which the resolver scans the service registry.
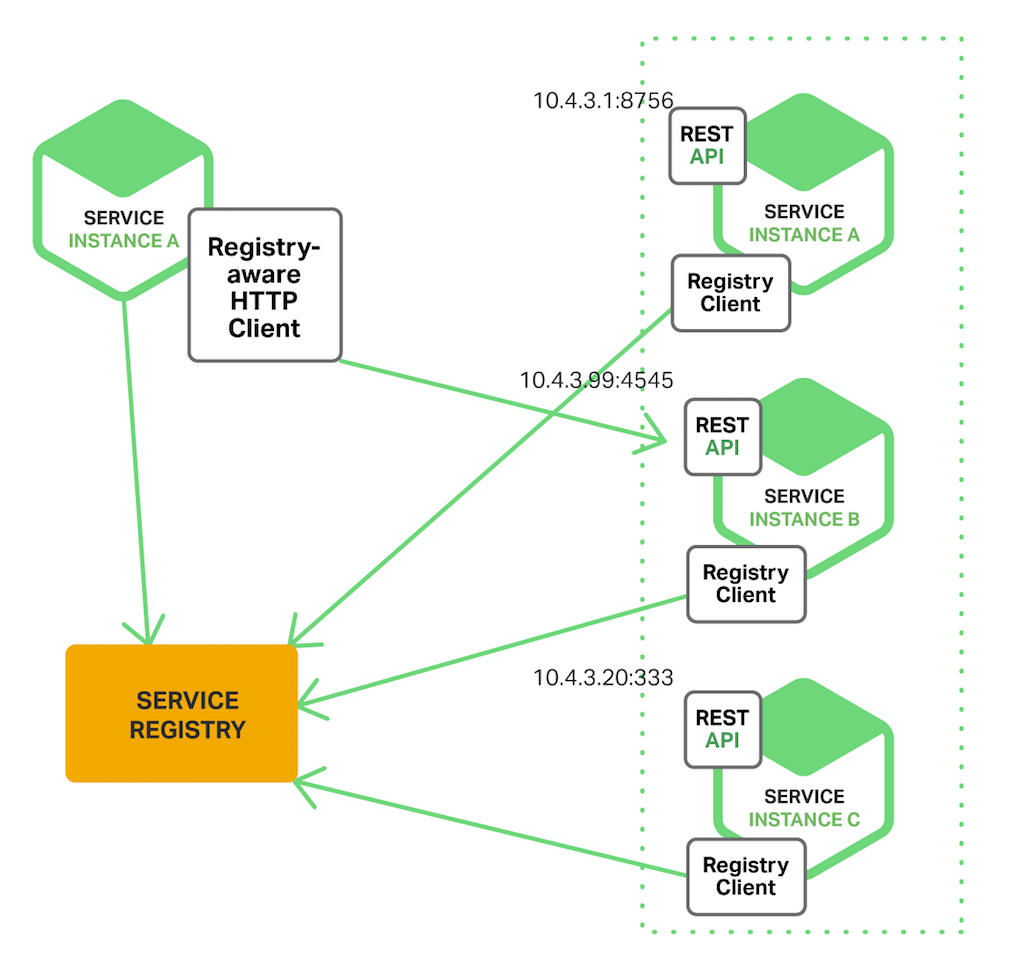
Figure 2 shows service discovery using a shared service registry, as described in our post on service discovery.

Running the Proxy Model in OpenShift
RedHat’s OpenShift Container‑as‑a‑Service (CaaS) platform is a robust, Kubernetes‑based container management system. As such, much of the core work to get the NGINX MRA up and running on OpenShift was creating the appropriate Kubernetes YAML files and deploying the containers. Once this was done, we configured the system to work in the Proxy Model architecture.
The first step was to create Kubernetes’ replication controller and service definition files. We created a single replication controller and service definition for each of our services because the MRA uses a loosely coupled architecture where each service can – and in many instances should – be scaled independently of the other services. For this reason each replication controller and service definition was created separately. (We combined the two files into a single file for ease of management purposes).
apiVersion: v1
kind: ReplicationController
metadata:
  name: auth-proxy
spec:
  replicas: 2
  template:
    metadata:
      labels:
        app: auth-proxy
    spec:
      containers:
      - name: auth-proxy
        image: ngrefarch/auth-proxy:openshift
        ports:
        - containerPort: 80
---
apiVersion: v1
kind: Service
metadata:
  name: auth-proxy
  labels:
    app: auth-proxy
spec:
  ports:
  - port: 80
    targetPort: 80
    protocol: TCP
    name: http
  selector:
    app: auth-proxy
In this simplest of formats, the specification indicates the name of the app, the number of instances, the location of the Docker image, and the ports, protocols, and type of service the auth‑proxy service needs and provides.
One of the conveniences that OpenShift provides is a mechanism for accessing Docker images in a private repo. By using the oc secrets command we were able to tell OpenShift where the credentials were and the account information it needed to pull the image from the remote repository.
Add Docker config as a secret:
$ oc secrets new pull_secret_name .dockerconfigjson=path/to/.docker/config.jsonAdd the secret to the service account for pulling images:
$ oc secrets add serviceaccount/default secrets/pull_secret_name --for=pullOpenShift has many facilities for managing and deploying Docker images, giving you a lot of flexibility for controlling the deployments of your applications.
Once the credentials were in place, we could use the oc create command to create replication controllers to deploy the services. To create the auth‑proxy service we ran the command:
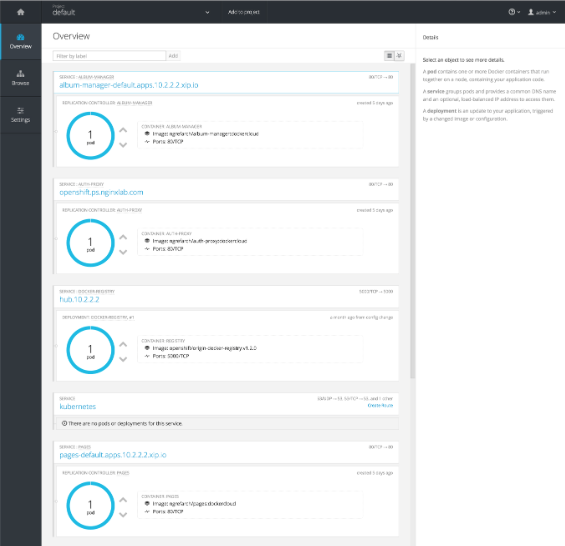
$ oc create -f auth-proxy.ymlAfter running this command for each service, we used the OpenShift Overview interface to check that all of the services were running and configured per the specification.

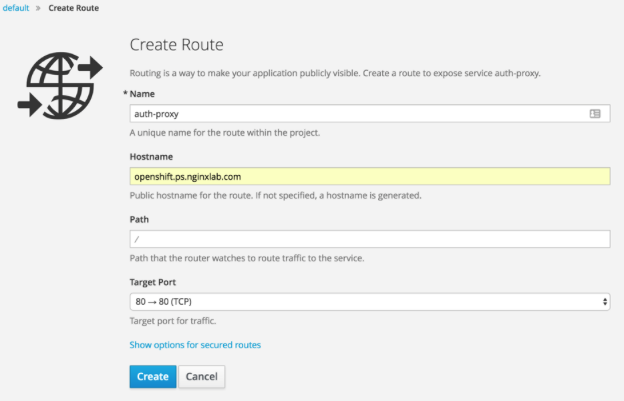
Because the Auth Proxy is the primary interface to the backend services, it needs a route. Routes are created in OpenShift using the Create Route screen in the GUI. You specify the route by selecting the service and opening the Create Route screen.
When naming a route, especially for single routes, it is a good idea to name the route the same as the service it connects to. This provides a clear association between the route and service – by default, this is the behavior of the Create Route tool.
Because OpenShift Routes are publicly accessible endpoints, they need to have a hostname. You can provide one, or have the system generate one. The system will use the xip.io DNS service to create a public hostname.
Finally you need to add the target port for the route. If you are using SSL/TLS, the Create Route tool provides you the ability to upload SSL/TLS certificates. Using the TLS passthrough setting, you can route TCP‑level traffic directly to the Auth‑Proxy container.
OpenShift proved to be a very capable CaaS platform for running the MRA.

Exposing Kubernetes Services with NGINX and NGINX Plus
One of the most exciting aspects of working in OpenShift is the upcoming opportunity to take advantage of the Kubernetes Ingress controller API when it is integrated with and available in OpenShift.
NGINX has developed an open source version of an NGINX‑ and NGINX Plus‑based Ingress controller that works with the latest versions of Kubernetes. This Ingress controller implementation uses a combination of NGINX and NGINX Plus features along with some custom Go code to do full service discovery, routing, and traffic management into a Kubernetes cluster.
NGINX Ingress Controller comes in two flavors: the open source version, which uses NGINX Open Source version 1.11.1, and the commercial version, which uses NGINX Plus Release 9 for managing incoming traffic.
The difference between the two is that the NGINX Plus version has a dynamic memory zone for managing servers in the load‑balanced pool. The use of NGINX Plus allows changes to be made on‑the‑fly, without having to reload NGINX, for many common load‑balancing events. This version also has a status API that can provide your APM with much more detailed information about the traffic metrics within a cluster.
In many respects, the Ingress controller will take on much of the responsibility of the Auth‑Proxy service in the MRA, but will provide a more generalized service for managing incoming traffic into the OpenShift cluster, allowing it be utilized for most any OpenShift application being deployed.
Conclusion
The ability to utilize NGINX Plus as an advanced load balancer for OpenShift is exciting and provides a lot of powerful capabilities for managing the traffic into your OpenShift application. OpenShift proved to be a solid platform for implementing the Proxy Model, which will now allow us to implement some of the more complex network architectures in the Router Mesh Model and the Fabric Model.
To try NGINX Plus for yourself, start your free 30-day trial today or contact us to discuss your use cases.


